
 Introduction
There are several different ways to begin raising chickens. If you want hens that will begin producing eggs very soon, you can start with started pullets.
If you aren’t in as much of a hurry and want to take part in raising them to laying age yourself, you can start with 4 to 9 week old chicks. These will have already spent their first 4-8 weeks in a brooder, and they will be ready or nearly ready to go straight into a chicken coop, depending on their age and your climate and weather.
Or, as many folks prefer and as we’ll discuss in this article, you can raise them yourself starting from day old chicks.
Brooding baby chicks is not difficult, but it does require some care and attention to details, and it is important to be properly prepared and have everything on hand that you’ll need before they arrive.
Before the chicks arrive
Here is what you will need to have on hand:
- Waterers — You’ll need a 1 gallon chick waterer for 50 birds. We prefer the quail waterers because the trough is narrow which makes it harder for the chicks to get chilled by standing in the trough and getting themselves wet.
- Table sugar — You’ll add this to their water for additional energy during the first few days.
- Quick Chick or Broiler Booster — these nutritional supplements are packed with vitamins and minerals that will help your birds grow.
- 250W Heat lamp and fixture —
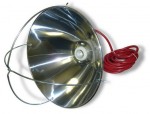 to supply the heat needed to keep the chicks warm.
 - Light — if the room is dark where you are brooding the chicks.
- Brooder box — 1/2 square foot per bird at the start, increasing to 3/4 square foot per bird at 4 weeks.
- Draft shield — if you are going to be brooding on the floor of a barn or other building.
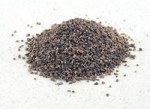
- Baby grit — this consists of small rocks that chicks will eat. The grit will go into their gizzard and help them crush the food that they eat.
- Grit hopper —
 a small hopper to hold the grit.
 - Commercial starter feed — look for a good quality, name-brand feed.
- Warm, boiled egg — as discussed below, this will get them off to a good start on day 1.
- Feeder — a 20″ to 24″ trough feeder is adequate for about 25 chicks
- Vasoline — useful for treating paste-up if it recurs (see below)
- vetRx — useful for treating respiratory and other ailments.
- A few black and white sheets of newspaper — placed on top of the bedding just for day 1 when you receive the chicks.
- Pine tar or Blue Kote — in case one of the chicks begins to become injured from pecking.
- Wood Shavings or other bedding material — Untreated wood shavings are one of the best bedding materials. See below for alternatives and other information on bedding.
Day 1
Water
Your birds will be thirsty when they arrive. Prepare a waterer for them. Fill it with warm water so that when they begin drinking from it, it will not lower their body temperature. Add 3 tablespoons of table sugar to each gallon of water. This will give them additional energy and help them get off to a good start.
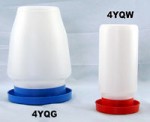 The number of chicks that you are receiving determines the size of the waterers you will need. For 50 birds, use a 1 gallon waterer. For 25 birds, use 2 of the 1 quart waterers. The quail waterers work best because they have small troughs that make it more difficult for the chicks to get wet by standing in them.
As you unbox your chicks and transfer them into the brooder, take each chick, one at a time, and lightly dip its beak into the water. Don’t submerge the bird’s head, but just get his beak wet. This will help the chick learn that the waterer is the place to get water.
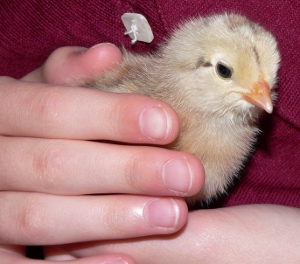
Boil an egg, then remove the shell and break the warm, boiled egg into small pieces. Feed this to the chicks when they first arrive. One egg should be enough for about 15 chicks. Boiled egg is very easy for them to digest, and its warmth helps maintain the baby chicks’ body temperature.
Heat
Chicks hatched and raised naturally by a broody hen depend on her for warmth. They are not able to keep themselves warm enough alone. You will need to supply heat for your baby chicks. Usually, the best way to do this is with a heat lamp. A 250W heat lamp bulb can supply enough heat to keep your chicks warm. Use a brooder lamp fixture to help focus the radiant heat downward toward the chicks.
The first week, your chicks will need to be kept at about 90-95 degrees (F). You can measure the temperature with a thermometer, but you should also pay attention to their behavior. If they are huddling together, that means they are trying to stay warm, and you should lower the heat lamp closer to them to supply more heat. If they are spread out, avoiding the area directly beneath the heat lamp, then it is supplying too much heat and should be raised so that it is farther away from them.
Heat lamps are very hot on the surface and can cause fires. Please be very cautious with how you use them, and anchor them securely so that they cannot fall onto a combustible surface. Please also check nearby combustible surfaces, such as wood, plastic or bedding material to make sure that they are not hot to the touch. If they are hot to the touch, then move the heat lamp farther away.
Some heat lamps are designated as being “shatterproof” or “shatter resistant.” At least some of these have a plastic coating on the bulb that helps the bulb resist shattering. Plastic, when heated, produces toxic fumes, and these fumes can be particularly harmful to chickens and other birds. So we recommend that you not use bulbs labeled “shatterproof” or “shatter resistant” with your chickens.
Bedding
To absorb manure, your chicks need some type of bedding. One of the best materials to use is wood shavings. Avoid cedar shavings, since those contain strong smelling resins that could be harmful to the chicks. You can typically find wood shavings at a local feed store. Be sure to avoid wood shavings that have come from treated lumber, since those would have toxic chemicals added as preservatives.
Other good bedding materials include rice hulls and crushed corn cobs.
Sand, straw and dirt will also work, but if possible use the other materials mentioned above. Avoid sawdust. The small particle size can cause chicks to mistake it for food and fill up on it rather than their feed.
It’s important that the bedding stay fresh and not damp. Damp bedding provides a place where bacteria that are harmful to the chicks can multiply. Clean out the bedding every few days and replace it with fresh bedding. The old bedding is an excellent addition to your compost pile.
The Brooder
In choosing what to use for a brooder, the main requirements are that it protect your chicks from predators, keep them contained, and protect them against drafts and rain.
 There are several different approaches. If you have a large building that already provides protection against rain, wind and predators, then you can raise the chicks on the floor of the building using a draft shield to contain them. The draft shield is a long piece of cardboard that can be arranged into a circle to enclose the baby chicks. The circular shape is ideal because there are no corners where the chicks might tend to pile up.
If you don’t have a protected building in which to use the draft shield, you can build a brooder that will provide adequate protection. For many years, I have used a simple wooden box brooder that has a plywood floor, 1×12″ wood sides and a mesh lid built on a 2×2″ frame. I put the brooder on my front porch, which gives protection against rain. I hang a heat lamp on a chain and suspend it above the brooder to supply heat. If the weather is cold, then I cover part of the mesh roof of the brooder with scraps of plywood to help it retain additional heat. When the weather warms up, I remove the scraps.
If you are raising large numbers of chicks in a box brooder, staple some cardboard in the corners to form rounded corners. This will help to prevent the chicks from piling up in corners at night, which can cause chicks to suffocate.
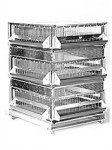
Start and grow brooder system
You may want to consider stackable start and grow units, a universal brooder box or a metal chicken brooder. These help to conserve space since they can be stacked vertically. In these brooders, the chicks are raised on a mesh floor, and their droppings fall through to a catch tray beneath. Because there is no bedding material, odor can be strong, so these types of brooders are mainly suited for use in a barn or outbuilding that has electricity to run the included heaters.
If you do some searches online for: chicken brooders or chick brooder boxes you will find many different types of brooders. Some have hinged lids. Some are up on legs. Sizes vary. Brooders are easy to build, and if you clean them out well after each use and store them out of the weather between uses, you can raise many batches of chicks in them.
Space
When your chicks first arrive, you should aim to provide about 1/2 square foot of space per chick. For 25 chicks, that amounts to about 12 1/2 square feet, or an area slightly larger than 3 foot by 4 foot. As they grow to 4 weeks and older, you’ll need to increase their space to about 3/4 square foot per chick. If you go much smaller than this you may have more trouble with the chicks pecking each other, and health problems may increase.
A draft shield formed into a circle about 5-6 feet across will house about 50 chicks. Use a circle 7-8 feet across for 100 chicks.
Food
It’s best to use a commercial chick starter for the first 8 weeks. Most likely you will be able to find that locally. We also carry organic feeds on our website. On the first day, cover the bedding with newspaper or paper towels. Next sprinkle some feed on the paper plus fill your feeders. This will help them be able to recognize and find the feed.
One question that often comes up is: Should I use medicated or non-medicated feed? If you have had your chicks vaccinated against coccidiosis before they were shipped to you, you should not use medicated feed because that would nullify the effects of the vaccination. In fact, one of the advantages of the vaccine is that it can provide protection against coccidiosis without requiring the use of medicated feed.
If you have not had them vaccinated against coccidiosis you can choose either medicated or non-medicated feed. The medication in medicated feeds is intended to prevent coccidiosis while allowing the chicks to develop natural immunity to it.
Day 2
Remove the newspaper or paper towels from the top of the bedding.
Check your chicks regularly. Make sure that they always have water and food available. As mentioned above, if they are huddling together to stay warm, then lower the heat lamp a little. If they are avoiding the area under the heat lamp, then raise it a little. When the temperature is just right, they’ll be running around the brooder without huddling. The ideal temperature at this point will still be at about 90-95 degrees (F), as it was on day 1.
If the bedding becomes damp or begins to smell strongly, replace it with fresh bedding.
Day 3
Baby chick grit
Continue as on day 2. In addition, sprinkle a little baby grit onto their feed. Use about as much as you would if you were salting food. Avoid putting too much at any one time because the bird might fill up on grit rather than feed.
The Second Week
The second week, your chicks will have grown a little, and they won’t need quite as much warmth. You can raise the heat lamp a little to reduce the temperature to about 85-90 degrees (F). Continue to make sure that they have fresh water and feed and clean bedding, and continue to sprinkle grit on their food.
Week 3
The third week, you can reduce the temperature to 80-85 degrees (F). As your chicks grow, they will consume both feed and water more quickly and will soil the bedding more quickly. You may need to put additional feeders and waterers into the brooder to make sure that they have plenty. Continue to sprinkle grit on their food.
Week 4
Increase the floor area to 3/4 square foot per bird.
Increase the number and/or size of feeders to provide 2 1/2″ to 3″ of space per bird.
Increase the waterers to supply 5 gallons per 100 birds.
Fill a grit hopper with appropriately-sized grits for the chicks at this age.
Install roosts at the back of the brooder area. Allow 4″ per bird with roost poles 6″ apart.
If brooding indoors, open the windows in the daytime for better ventilation. Leave the windows partly open at night.
Prevent water puddles from forming around founts. A good way to do this is to place the founts on platform stands, which can be purchased from our website or made from hardware cloth and dimensional lumber.
You can let the birds range outside on warm, sunny days, but only if clean range is available.
When the chicks are in the brooder, keep the temperature at around 70-75 degrees (F).
Week 5
Reduce the brooder temperature to 70 degrees (F).
Week 6
By this point, your chicks will probably not need any supplemental heat. If the weather where you are located is cold, wet and windy, they will need continued protection against the wind. Other than that, you can move them to a chicken pen or chicken tractor.
Special Note for Meat Birds
For Jumbo Cornish X Rocks and Cornish Roasters, both of which are very fast growing, try starting them on broiler starter. The higher protein seems to help them avoid leg problems.
We also recommend that you not let these birds eat all they want, free choice. Fill the feeders each day, and let the feed run out in the late afternoon. Research has shown these birds will grow just slightly more slowly that way but have considerably less problems than if you fed them continuously. Use a supplement such as Quick Chick or Broiler Booster in their water from start to finish to supply extra vitamins.
Potential Problems
Hard Trip
If the birds have had a hard trip, put an additional 6 tablespoons of sugar in each gallon of water. Then mix some of this extra sweet water with some of your feed to make a soupy mix. Give your birds this special feed and sugar-water mix for 3-4 days to help them recover from the effects of shipping.
Paste-up
It’s not unusual for newly hatched chicks to have some problem with paste-up. Some breeds seem more prone to it than others.
Paste-up is what occurs when manure cakes onto the rear end of the chicken so that it covers the vent and begins to build up there. It’s important to look for this and treat it quickly, as it can obstruct the vent and become fatal.
Treat it by using a warm, wet washcloth to gently remove the manure. Usually after you’ve done this once or a few times, the problem will clear up. If the problem continues for certain chicks, then apply some vasoline to the rear end of the chicken around and below the vent after cleaning the manure off. This will help prevent the manure from sticking. Usually paste-up will cease to be a problem after a few days.
Pecking
Chicks may peck and harm one another, particularly if they are too hot, too crowded, bored or lacking fresh air. Sometimes, though, pecking can occur for no obvious reason.
With pecking problems, an ounce of prevention is worth a pound of cure. Try putting in fresh grass clippings a few times a day. Also try darkening the room where the brooder is located. Make sure that your chicks have plenty of room. 3/4 square foot per bird should be adequate for weeks 2 through 5.
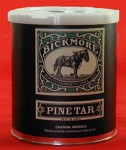 If one of the chicks begins to become injured, isolate him from the others until he heals up. You can also apply pine tar or blue kote.


When hatching chicks from eggs laid at home. Should the egg be gathered daily and then placed in the laying box when enough (7-8) are gathered. Or just leave them in the nest until the hen is ready to sit? Thanks
I collect my hatching eggs at least daily — preferably several times during the day. Collecting them keeps them cleaner and safer than leaving them in the nest.